


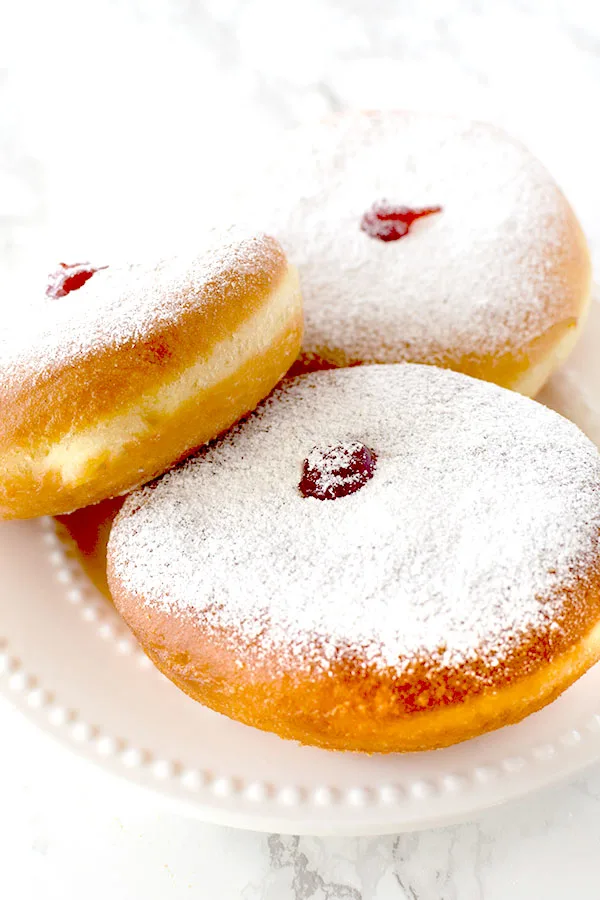
Sufganiyot are Israel’s most popular Chanukah food. These powdered jelly doughnuts are by far the best I’ve ever made and are even better than the bakeries'.

Weeks prior to Chanukah, you can smell sufganiyot baking wherever you go in Israel tempting you to bite into the fluffy powered pastry.
Every bakery, pastry shop, mini market, and grocery store is filled with them.
There is nowhere this is more true than while walking the streets of Jerusalem. There, the holiday spirit truly comes to life.
Not only through the smell of heavenly jelly filled donuts filling the crisp winter air, but all around you.
I remember looking out the bus window one evening during first Chanukah as an adult in Israel.
The streets in the heart of town were streamed with blue and white lights. Chanukah menorahs were on display and a life sized one was lit, only walking distance, at the Wall.
As we drove up Agripas I saw Israelis, immigrants, and tourists fill Machane Yehudah Market wondering from shop to shop and buying sufganiyot from the bakeries.
I watched this in awe, realizing that most of these people, religious or traditional, would be lighting candles just as I would.
For the first time, I felt truly connected to Chanukah, which every other year had been outshone by Christmas in New York. I felt blessed.
Since that night, just the smell of sufganiyot puts me in a happy and content mood.
I’ve tried to make them a number of times with little success. They were always too heavy and/or too yeasty.
In part, this may have been due to having the oil on too high of a temperature, causing them to cook too quickly. After a lot of trial and error, though, I’ve finally found the perfect recipe!
By the way, if you want to also try another Chanukah classic, make latkes.
This recipe was adapted from a sufganiya recipe by my favorite Israeli food blogger/youtuber Hen in the Kitchen.
BREAD FLOUR VS ALL-PURPOSE FLOUR
Bread flour has a higher protein content than all-purpose, which helps with gluten development.
This creates a chewy texture and heavier and denser bread. This can be great in recipes like bread bowls. However, it is less desirable in breads like challah bread, which you want to be light and fluffy.
All-purpose flour has a lower protein content, but can generally be substituted for bread flour.
Can I use whole wheat flour instead?
Generally, if you want to use whole wheat flour in bread, it's recommended to replace up to half of the all-purpose flour called for with whole wheat flour.
HOW TO MEASURE FLOUR AND OTHER DRY INGREDIENTS
The best way to measure dry ingredients is with a scale. However, this is not commonly done in the United States, where dry measuring cups are used instead.
To measure most dry ingredients, first spoon them into a dry measuring cup and then level off the measuring cup with an upside-down butter knife.
Make sure not to pack it down because it can lead to using more of the ingredient than called for.
The exception is brown sugar. To measure brown sugar, pack it into the measuring cup and then level off any excess.
To measure chocolate chips, nuts, or dried fruit, just pour them in and then level them off.
DRY VS LIQUID MEASURING CUP
Dry measuring cups are a set of cups that often come with measuring spoons. Each cup is a different measurement just like each spoon is a different measurement.
Liquid measuring cups, on the other hand, are cups that have measuring lines on the side to mark the measurements.
The problem with using liquid measuring cups to measure dry ingredients (like flour and cocoa) is that they are powders. So, as you shake the cup to level them off, the powders settle and you end up with more than you need.
I tested this with a friend who didn't believe me and we ended up with a number of tablespoons more than the recipe called for.
WHY sift Powdery Ingredients
There are a number of benefits to sifting powdery ingredients like flour and cocoa.
First of all, flour is often sifted before use to aerate it and remove any lumps. This helps in achieving a lighter texture in baked goods.
Secondly, if you measure flour that's just been sifted, you can get a more accurate measurement than from flour that's been packed tightly in a bag.
In addition, sifting dry ingredients together, such as flour, cocoa, and baking powder, helps make sure they're evenly dispersed.
Yeast
Yeast is used in bread and other baked goods to create a light and airy texture.
It does this by fermenting sugars, which causes dough to rise.
In most cases, the yeast is dormant until activated or "bloomed" by being rehydrated and woken up. Usually, this is done with warm liquid and a small amount of sugar.
Once activated, it begins the proofing process.
"Proofing" is the fermentation process where yeast eats the sugar and forms bubbles, indicating that it's alive and ready to leaven the dough.
Types of YEAST
There are seven different types of yeast used for baking. However, only five are relevant to home bakers, and just about all my recipes only use instant yeast.
WILD YEAST
Wild yeast is found naturally in the air. This type of yeast is used for sourdough breads, and in order to use it, you need to make a sourdough starter.
FRESH YEAST
Fresh yeast, cake yeast, block yeast, wet yeast, or compressed yeast, is found in small, foil-wrapped cubes.
It is far less popular with home bakers because it’s highly perishable. However, it is still widely available for commercial use and is still used by home bakers in some countries.
The benefits of using it is that it’s easier to measure and has the most leavening power.
If you want to use fresh yeast in this recipe, then for every 1 teaspoon of instant dry yeast, you'd need 17 grams (or 0.6 ounces) of fresh yeast.
Make sure to bloom it before using it in this recipe.
ACTIVE DRY YEAST
Active dry yeast looks like large-grained powder, mainly used by home bakers in the United States.
It has a much longer lifespan than compressed yeast, lasting up to a year at room temperature and more than a decade if frozen.
The main downside of using this is that a lot of the yeast is already dead, so you need more of it than other yeasts. This can cause an undesired yeast flavor.
If you want to use active dry yeast in this recipe, then for 1 teaspoon of instant dry yeast, you need 1 ¼ teaspoons of active dry yeast.
Make sure to bloom it first before using it in this recipe.
INSTANT YEAST
Instant yeast looks the same as active dry yeast. However, it does not need to be proofed before using.
Instead of having to be activated in warm liquid first, it can be added as is when making the dough.
It is more perishable than active dry yeast, lasting only 2 to 4 months at room temperature, but lasts for years if kept in the freezer.
This is my favorite type of yeast to use because it lasts longer than fresh yeast, and you need less of it than active dry yeast. I use it whenever I make challah, dinner rolls, cinnamon rolls, or sufganiyot.
RAPID-RISE YEAST
Rapid-rise yeast is often specifically marketed toward users of bread machines. It’s essentially instant yeast with a smaller grain. The smaller granules allow it to dissolve faster in the dough and therefore rise faster.
While most baking experts believe that the bread flavors aren’t as developed by using this yeast, others feel it makes little difference.
Activating Yeast
The purpose of activating yeast is to make sure that the yeast cells are alive. This is a necessary step for most types of yeast.
To activate the yeast, mix the yeast with warm liquid (usually around 110°F or 43°C) and a small amount of sugar. The sugar provides a food source for the yeast. After a few minutes, the mixture should become frothy, indicating that the yeast is active and ready for use.
WHY ACTIVATE OR BLOOM INSTANT YEAST?
"Activating" and "blooming" yeast are different terms for the same process.
While instant yeast does not actually need to be bloomed, I do it anyway because it helps troubleshoot if any problems come up.
By blooming the yeast first, you know it is active. So, if the dough has trouble rising, you know it’s not the yeast.
This is particularly useful when you don’t have a “warm” place to let it rise.
While the sugar content may matter for most types of yeast, it doesn't seem to make a difference for instant yeast.
When I activate instant yeast, I usually mix all the liquid, sugar, and yeast together in the bowl. Once it froths up, I add the rest of the liquid ingredients followed by the rest of the dry ingredents.
How to Bloom Yeast
To bloom, place the yeast, lukewarm water, and sugar together in the bowl. Stir and wait for it to activate.
The water must be warm because hot water will kill the yeast and cool water won't activate it.
If you are using fresh yeast, make sure to break it up with a fork once it is in the water.
You know the yeast is activated when foam appears on the surface. This can take up to 10 minutes.
Storing Yeast
Once opened, store in an airtight container and keep in a cool, dry place.
If you keep the yeast in the freezer, it will stay good for years.
HOW LONG DOES IT TAKE DOUGH TO RISE?
How quickly dough rises depends on how warm the environment it is rising in is.
If you put it in the fridge for instance, it could take 8 hours or so. If you leave it on the counter in a comfortably warm room, it's usually 45 minutes to 1 hour.
However, sometimes dough can take up to 2 hours to rise depending on a variety of factors.
HOW TO RISE BREAD FASTER
To speed up the rising process, you can preheat the oven to its lowest temperature and turn it off.
Then, cover the dough with a damp towel and place it in the oven.
This trick works for me every time. On occasion, I may need to remove the dough and preheat the oven another time or two, but usually just once does the trick.
Some bakers feel it doesn’t allow flavors to really develop. Personally, I've never noticed much of a difference.
PUNCHING DOUGH DOWN
"Punching" is a bit of a strong word. Yeast is a delicate living thing, so you actually need to treat it with care.
What you’re really doing is lightly pressing down the dough through the center with your fist. This removes gases that have formed during the first rise.
By doing this, you are also bringing the yeast, sugar, and moisture back together, which is important for the second rise as the yeast feeds on the sugar.
After you “punch” down the dough, you should pull the edges of the dough to the center. Then, take the dough out of the bowl and place it on a lightly floured board. Next, scrape out the remaining dough from the bowl using a rubber spatula.
Lastly, shape your dough into a ball, and if desired, you can knead the dough two or three times to release additional air bubbles.
I like kneading my dough a few times by hand after the mixer has done most of the work. This creates an extra smooth crust.
THE SECOND RISE
The second rise allows the yeast to feed longer on the sugar. This allows the bread to become larger, have a better crumb, and develop a better flavor.
Also, if you were to let it rise only once, punch it down, shape it, and stick it in the oven, your bread would rise somewhat, but not enough for it to become fluffy.
Overproofing Dough
Letting the dough rise is known as "proofing the dough." Overproofing is when you let the dough rise too much.
If you let your dough rise too much, it will seem big and beautiful at first, and then it will fall and become dense after it's removed from the oven.
If you've found that you left the dough to rise to much larger than double its original size, punch it down, reshape it, and then let it rise to its proper size.
How long can I keep dough in the refrigerator?
You can refrigerate dough for up to 2-3 days. After that, the yeast may lose potency.
Keep in mind, the dough will continue to rise slowly during that time.
Can I freeze unbaked dough for later use?
You can freeze dough in airtight freezer container for up to four weeks.
When you're ready to use it, first thaw the dough in the refrigerator overnight.
It will take up to twice as long for the dough to rise as it would if it hadn’t been frozen.
Why did my dough turn out dense and heavy?
This can be due to overkneading, not letting it rise completely, overproofing, or using too much flour.
Baking with Humidity
Humidity can have a big impact on how your baked goods come out.
This is because when humidity is extremely high (think 70 percent or more), baking ingredients like flour, sugar, salt, baking powder, and baking soda soak up moisture from the air.
This can negatively impact the outcome of your cakes, cookies, yeast breads, and quick breads.
There are some things you can do to try to save your baking.
Try to counterbalance the additional moisture
To help counterbalance the additional moisture your dry ingredients soak up from the air, try reducing the amount of liquid in the recipe by about one quarter.
If the batter or dough looks too dry once all the ingredients are mixed together, add additional liquid a tablespoon at a time until you have the desired consistency.
This is not usually possible to do for cookies, but it does work for cakes and breads.
Store Ingredients in the Fridge
If flour and sugar are stored in the refrigerator or freezer rather than in a cupboard or pantry, they are better protected from humidity.
As an added benefit, keeping these ingredients cool also helps keep them fresher longer, in addition to helping them stay bug-free.
For the best results, let them warm to room temperature before using.
Bake for Longer
If you bake your goodies for a few extra minutes, it can help the liquid to cook off.
To avoid overbaking, continue testing for doneness every couple of minutes for breads, quick breads, cakes, cupcakes, and muffins. Cookies, on the other hand, need to be checked every minute.
Use Air Conditioning
To help lower humidity levels on humid summer days, air condition the room for at least an hour before you start baking.
Cooler air isn’t able to hold as much moisture as warm air.
Store your baked goods in an airtight container
Humidity can also ruin your fresh-baked goods because when they are left out, they can absorb moisture.
To avoid this, store them in an airtight container or resealable bag.
HOW TO STORE
Cover tightly with plastic wrap. This will preserve them for two days at room temperature. To preserve them for up to a week, refrigerate them in a sealed plastic bag with as much air removed as possible.
HOW TO FREEZE
It's preferable to freeze un-powdered Sufganiyot. To freeze, store inside of a heavy-duty freezer bag and squeeze out the excess air before sealing.
The freeze for up to 2 to 3 months. After that time, they will still be safe to eat but their quality will begin to degrade.
Sufganiyot SNAFU:
The first time I made these, I heated the oil to 350°F or 175°C and simmered it on each side for a minute. The recipe came out great, but a little flatter than I'd like it.
Sufganiyot
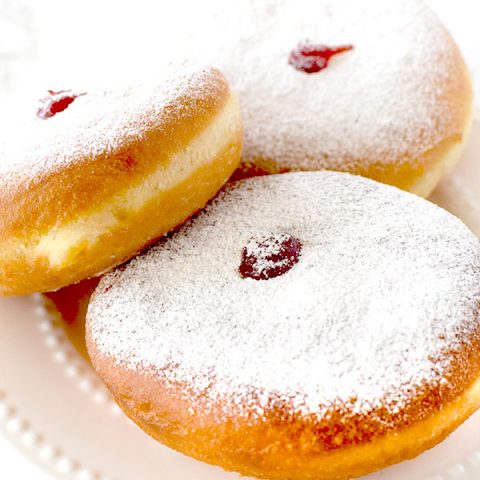

Sufganiyot are the most popular Chanukah food in Israel and are found everywhere for at least a month or two prior to the holiday.
Ingredients
- 4 cups all-purpose flour (500 grams)
- ½ cup white sugar (100 grams)
- 1 tablespoon dry yeast
- 1 teaspoon salt
- ¼ cup oil (60 milliliters) and extra for frying
- 2 eggs
- ¾ cup warm water (175 milliliters)
- 1 tablespoon vanilla extract*
Filling and Dusting
- 1 cup strawberry jelly (300 grams)
- ¼ cup powdered sugar (30 grams)
Instructions
- Place flour, sugar, yeast, and salt into the bowl of the stand mixer. Mix.
- Add oil, eggs, water, and vanilla extract. Knead using a bread hook. Leave the dough to mix on low for 10 minutes, at the end of which it should be smooth but tacky. Add more flour if needed.
- Move the dough to an oiled bowl. Cover with a towel or plastic wrap and let sit until double in size.
- Place the dough on a well floured surface and sprinkle the top with flour as well. Roll the dough out until it is about ½ inch or 1.25 cm. Cut out circles using a 2'' or 3" cookie cutter dipped in flour.
- Using a spatula, carefully remove the circles and place them on a floured tray. Take the remaining scraps and knead them together. Let sit for 5 minutes.
- Repeat steps 4 and 5 until dough is used up. Sprinkle the circles with flour and cover with a towel. Set aside and let sit for 40 minutes in a warm place.
- Fill a large pot with oil for frying, 2 inches deep (5 centimeters).
- Heat the oil to 320°F - 340°F or 160°C - 170°C. If you do not have a thermometer, test the oil by placing a small piece of dough in it. If it sizzles and floats, the oil is hot enough.
- Place 3 or 4 sufganiyot in the pot one at a time. Do not crowd. Let them simmer for 1 ½ minutes on each side until golden brown. Remove and set aside.
- Using a squeeze bottle or a syringe filled with jelly, puncture a hole in the top and fill. Dust with sugar.
Notes
*I love vanilla extract, but it isn’t cheap. Instead, you can use one teaspoon of extract and 1 tablespoon of liquor.
Nutrition Information:
Yield:
16Serving Size:
1Amount Per Serving: Calories: 227Total Fat: 4gSaturated Fat: 0gTrans Fat: 0gUnsaturated Fat: 4gCholesterol: 23mgSodium: 147mgCarbohydrates: 42gFiber: 1gSugar: 15gProtein: 4g
Eileen
Friday 20th of December 2024
Has anyone made the sufganiuot ahead, froze them then warmed in air fryer?
LIZETTE AGUILAR
Sunday 14th of February 2021
Can you bake these?
ElissaBeth
Tuesday 16th of February 2021
Technically, but they will likely come out similar to bread if you do.
Heather Jamieson
Tuesday 15th of December 2020
I did not realize that you can knead dough by using the dough hook like that. The dough came out golden and tacky. It is on its first rise now. I love this recipe! Having baked and cooked for 55 years now, I can guarantee that this will make great sufganiyot. I look forward to watching my family trying to get the last one.
ElissaBeth
Wednesday 16th of December 2020
I'm very happy to hear you liked the recipe :) I hope you and your family enjoyed the sufganiyot!
Leah
Monday 14th of December 2020
I tried making these yesterday and even though they looked amazing on the outside , the inside didn’t cook all the way through :/ what am I doing wrong ?
chef seb
Thursday 30th of May 2024
@Leah, dough might be too thick or oil too hot. try frying at 320f and dough no thicker than 1/3"
ElissaBeth
Monday 14th of December 2020
It sounds to me like you are cooking it at too high a temperature.
Marci
Wednesday 9th of December 2020
I would like to prepare the dough one day in advance. At what point should I refrigerate the dough? Before the first rise or shape and refrigerate?
Thank you
ElissaBeth
Wednesday 9th of December 2020
I always do it before the first rise because it saves space and you don't need to worry about it over rising.